Simple DIY: Cable Knit Throw Pillows Out of Old Sweaters
It's that time of year again. The fourth dimension when all things warm and cozy start to find their way into your daydreams and post-workday relaxation. This article will testify you how to create a perfectly cozy throw pillow (or 2, actually) out of a favorite, thrifted, or otherwise caused cable knit sweater.
 View in gallery
  View in gallery
 In under an hour, you'll be snuggling upwards with your favorite volume and beverage. Let's go started.
 View in gallery
 DIY Level: Beginner
 View in gallery
 Materials Needed:
- Two (2) old throw pillows or pillow forms (I found these two at a local thrift shop; 1 was make-new)
- Two (2) cable knit sweaters, large enough to fit over pillow forms
- Matching thread, sewing machine, scissors, pins
 View in gallery
 I picked up a couple of verrrrrry vintage throw pillows at a thrift store for cheap. After thoroughly laundering them, I cut them open to retrieve the pillow forms inside.
 View in gallery
 Because, as I shortly discovered, the pillow forms weren't actually forms only rather polyfil stuffing in the shape of forms, I apace sewed lite cotton covers for them. If yous observe yourself in this position, wrap the polyfil in a white cotton scrap of textile and pin the edges.
 View in gallery
 Stitch along the pins. This will help the polyfil retain its shape as you work with it to brand your ain cable knit (sweater) throw pillows.
 View in gallery
 Plough the sweater inside-out.
 View in gallery
 Slide your pillow form inside the inside-out sweater.
 View in gallery
 If your sweater cable knit is uniform (as in, it doesn't have a "eye" or is symmetrical from a certain betoken), slide the pillow course right adjacent to ane of the sweater's side seams. Give yourself enough room at the lesser of the sweater to cover the pillow form, and then mark where the top seam needs to be with a pin.
 View in gallery
 Rotate your sweater xc degrees and pivot where the other side seam will demand to be.
Related: Summit 6 Best Cooling Gel Pillows for People Who Run Hot
 View in gallery
 Pull the pillow form out and flatten the height and bottom layers of the sweater. Pivot the "lines" for your 2 new seams, the meridian and the side. You don't demand to worry virtually the bottom seam at this betoken; it will stay open for now.
 View in gallery
 Taking care not to pull your sweater at all, sew together your seams with a straight stitch.
 View in gallery
 Directly outside the straight-stitch seam, sew a wide zigzag seam all along your freshly sewn top and side seams. This will help the sweater avoid unraveling over time.
 View in gallery
 You can see the ii seams hither on the sweater.
 View in gallery
 Cut about one" outside your zigzag stitching on both seams.
 View in gallery
 Take the corner on your new seams.
 View in gallery
 Fold the corner so that the two seams bear upon each other. You're going to sew a short seam perpendicular to the existing seam, nigh two" downward from the corner (designated by the dotted red line in the photograph).
 View in gallery
 Sew the short perpendicular seam. Echo for the other corner along the seam that will be the top of your pillow.
 View in gallery
 What those perpendicular seams do is create this type of corner for the pillow; it looks a petty more than professional person and finished. Yous could choose to omit this step, if you don't listen right-bending corners poking up from your pillow.
 View in gallery
 Flipping your sweater right-side out, slide information technology over your pillow grade.
 View in gallery
 Smooth the sweater over both sides of your pillow class.
 View in gallery
 You can hand-stitch the bottom seam if you want by folding the "raw" ends (they're really finished, because information technology'due south the bottom of the sweater, but we're calling them "raw" hither) in and sewing. Or you can machine-sew together information technology, which is what I opted to practice for this 1. I folded and pinched the two ends in from each side seam, about 2".
 View in gallery
 It'll await something like this. Pin in place.
 View in gallery
 Sew nearly 1/2″ to 1" away from the matched-upwardly raw edges to terminate upward the bottom seam. You can double-sew together, to brand sure the seam holds better.
 View in gallery
 This method won't look as finished as a hidden hand-sewn seam.
 View in gallery
 But when you set the pillow upright, the seam is easy to tuck underneath.
 View in gallery
 If you have a sweater that has a center focal bespeak and/or a v-neck, you lot'll have to fudge the original layout a bit before it's set to pin with the pillow form inside. Allow's become through those steps. This sweater has a v-neck.
 View in gallery
 Lay the sweater out on a flat surface, 5-neck side facing up. Cut off a sleeve on the outer role of the sleeve/shoulder seam. Your goal is to maintain a straight line upwardly the side of the sweater rather than follow the sleeve/shoulder seam line.
 View in gallery
 Cut forth the sleeve seam to open up the sleeve.
 View in gallery
 Tuck the flattened sleeve inside the 5-neck, taking intendance to maintain a wide enough overlap betwixt the sleeve'south raw edges and the v-neck line.
 View in gallery
 Pin the flattened sleeve to the 5-neck. Be sure to avoid stretching either component at all. Also, do not grab the back side of the sweater in your pinning. You only want to pin the flattened sleeve and the v-neck itself, nothing more than.
 View in gallery
 Y'all don't need to worry about pinning the upper neck expanse; just pin the front of the v-cervix.
 View in gallery
 Sew, in a place that is logical and minimally noticeable, the flattened sleeve slice to the v-neck. Over again, accept care non to stretch either component in any way; doing so will outcome in a stretched-out, lumpy-looking cablevision knit throw pillow.
 View in gallery
 Your modified 5-neck volition look something similar this.
 View in gallery
 Turn the sweater inside-out and slide the pillow form in. This time, nonetheless, you lot'll demand to be sure to eye the pillow class inside the sweater, then you'll be pinning for three seams (two sides and the height).
 View in gallery
 Pin the seams, and stitch the sweater in the same manner as already described. (Remove the pillow course. Sew the seams, starting time straight-stitch then zigzag.)
 View in gallery
 Cut the sweater along your newly sewn seams, about an inch away from (outside) the zigzag stitch. As described previously, turn the sweater right-side out and slide the pillow form within, and then stitch up the bottom seam, either past motorcar or paw.
 View in gallery
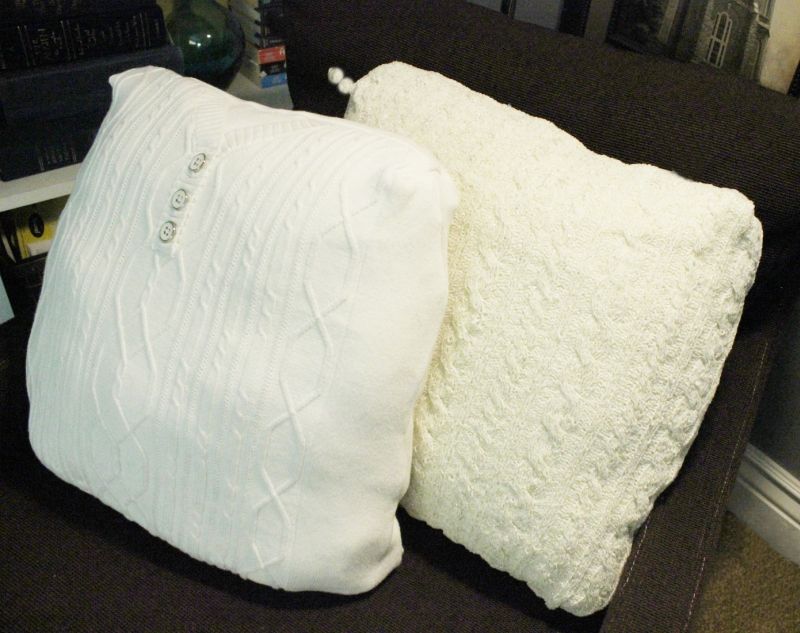
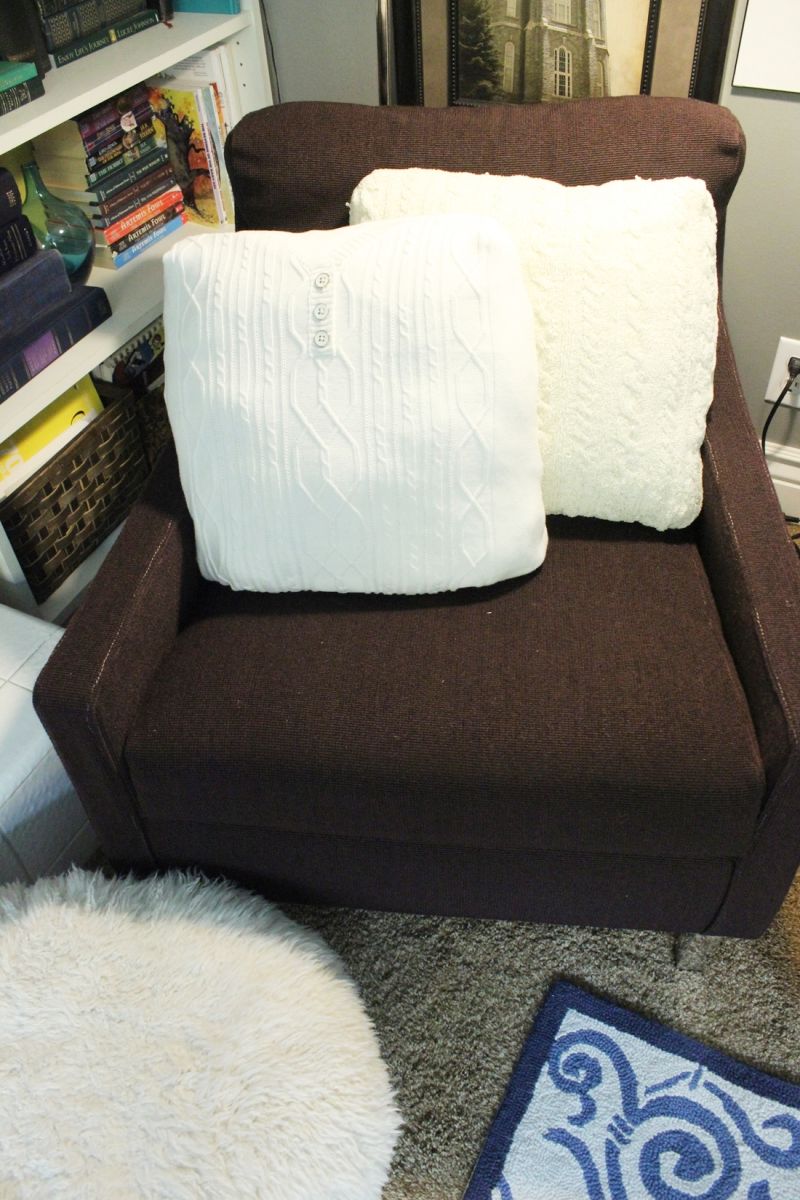
 Viola! Two cozy cablevision knit sweater throw pillows.
 View in gallery
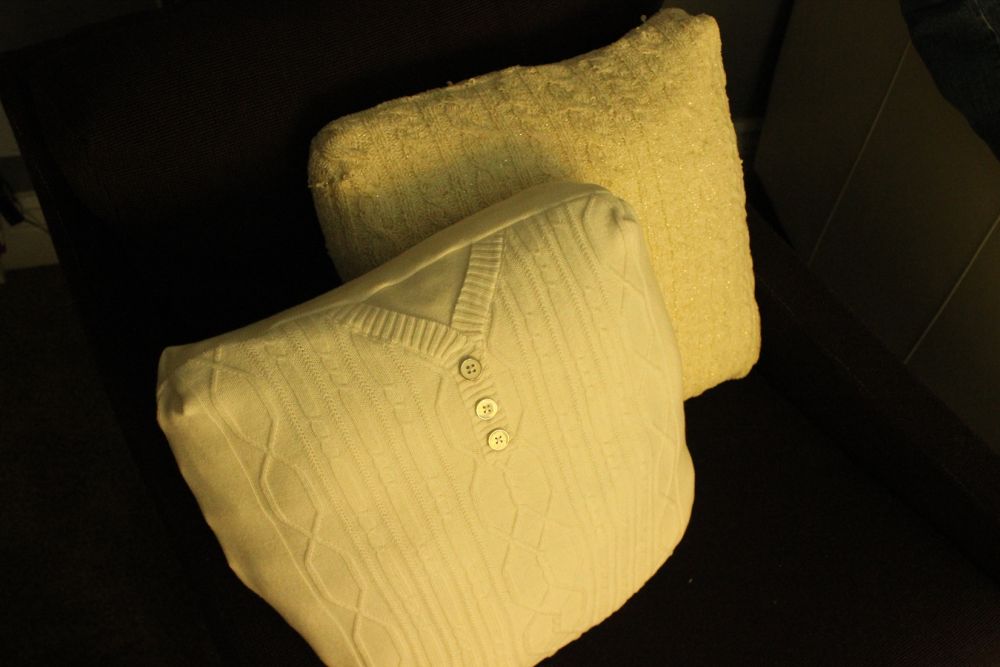
 I love the v-cervix detail on the forepart pillow peculiarly.
 View in gallery
 These pillows are surprisingly easy to make; don't be intimidated by the thought of working with a sweater while sewing. If you're conscientious to not stretch it weird and y'all seal off the seams with zigzag stitching, you'll be only fine.
 View in gallery
 Happy Fall, and happy DIYing.
Source: https://www.homedit.com/cable-knit-sweater-pillow/
0 Response to "Simple DIY: Cable Knit Throw Pillows Out of Old Sweaters"
Post a Comment